Have you already chosen your LED lights but are worried about the installation? Don't worry. In this guide, we will cover everything from the initial design (where to place them) to the final electrical connection.

Whether you are building a new pool or renovating an existing one, here you will find the diagrams and materials you need.

PHASE 1: Design - Where and how many lights to place?

The golden rule is orientation. Whenever possible, install the lights pointing away from the house or seating area.

  • Why? To avoid glare. We want to see the pool illuminated, not a spotlight blinding us while we have dinner on the porch.

At what height should they be installed?

We recommend installing them about 50-60 cm from the water surface.

  • Key advantage: At this depth, you can change the bulb or check the light from the pool edge without needing to drain it or get into the water (provided you leave enough cable coiled in the niche or behind the light).

The correct quantity according to size

Don't make the mistake of putting a single very powerful light. It is better to distribute the light.

  • Small pools (< 6m): 1 powerful light on the short end.
  • Medium pools (8x4m): 2 lights on the long side wall.
  • Large pools (> 12m): 3 or more lights distributed laterally.

Pro Tip: If your pool has irregular shapes or Roman steps, install additional mini lights on the steps to avoid dangerous shadow zones. See Mini Lights for Stairs.

PHASE 2: Physical Installation (Mounting)

Depending on your pool, the mounting changes radically. Identify your case:

Case A: Installation with Niche (Classic Concrete Pool)

This is the most robust system. A plastic "bucket" is embedded in the wall during construction.

  1. The Niche: Placed before spraying the concrete.
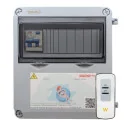
  2. The Conduit: Connects the niche with the external junction box. It is vital that it is watertight.
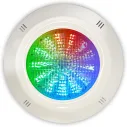
  3. The Light: Fits inside the niche and is fixed with claws or screws.

Easier: Replacing a fused PAR56 lamp is a simple process, but somewhat tedious, and if the installation is not perfect, it can end up blowing the new bulb due to flooding, voiding the warranty.

If you want to avoid these problems and perform a clean installation in minutes, use our "30W LED Pool Light with Niche" system.

Case B: Surface Installation (No recess)

Ideal for existing pools, steel pools, or when you don't want to drill a large hole. It is a more modern, flexible, and economical system.

  1. The Crosshead or Bracket: It is a cross-shaped plastic piece that is screwed to the flat wall. This must be screwed directly into the pool wall.
  2. The Light: Screwed onto the crosshead or bracket, remaining flush against the wall (protrudes about 4-5 cm).
  3. Advantage: If you use our lights with a standard crosshead or bracket, you can often renew old lights using existing holes without needing to drain the pool water.

PHASE 3: Electrical Installation (What nobody tells you)

This is where 90% of "DIY" installations fail. Pool lighting runs at 12V (Low Voltage), not 220V.

1. The Transformer

You need a transformer that converts household electricity (220V) to 12V.

  • Safety: Never connect a light directly to the mains. It will explode and is dangerous.
  • Type: If your lights are LED, make sure the transformer is compatible (12V AC or DC depending on the model).
  • Calculation: Sum the watts (W) of all your lights. The transformer must have spare power. (Ex: For 2 lights of 35W = 70W total -> Use a 100W or 130W transformer, never a tight 60W one).

2. Cable Gauge (Very Important!)

At 12V, electricity loses strength with distance. If you use a thin cable and the transformer is far away, the light will receive 9V instead of 12V and will shine dimly or change colors poorly and can end up burning out.

  • General rule: Use copper cable of at least 2.5mm² for short distances. If there are more than 10-15 meters between the transformer and the pool, upgrade to 4mm².

Flexible Electric Hose Black 2 wires (metre)

16002
The 1000V 3 Hose, with three conductors, is an ideal choice for low demand residential, commercial and industrial applications.Superior strength: Capable of withstanding up to 1000V, providing maximum safety. Great versatility: Perfect for all types of wiring, both general and specialised. Excellent quality: Manufactured with materials that ensure a...

3. The Watertight Splice

Never make a splice with electrical tape underwater or underground. It will rot.

  • Always use IP68 Torpedo Connectors. If water enters the cable, it will rise by capillarity to the light and break it.
Conector De Cable Estanco Conexión Hembra Macho | 4 Pines 0.5-2.5mm² IP68 - 1 Conector De Cable Estanco Conexión Hembra Macho | 4 Pines 0.5-2.5mm² IP68 - 1 2
  • New

Conector De Cable Estanco Conexión Hembra Macho | 4 Pines 0.5-2.5mm² IP68

WP4-25
IP68 4-Pin Waterproof Cable Connector: Secure and Durable ConnectionMaximum Protection: Designed with IP68, it offers total resistance against water and dust, ideal for demanding environments. Connection Versatility: Includes both male and female connections, making it easy to integrate into a variety of systems. 4 Pin Connection: Ensures efficient and...
€3.33

Still have doubts? Contact us

Don't risk buying the wrong light. Take a photo of your current pre-installation and send it to us via WhatsApp. We will help you with the choice and installation.

Contact via WhatsApp

Comments (0)

No comments at this moment

New comment

You are replying to a comment

Product added to compare.
Product added to wishlist